Best Presentation Tools for Teachers Who Teach Online
Teaching online is not just about having a camera and a microphone. Every teacher who has run a live class knows that the real challenge is keeping students focused on the right part of the screen at the right moment. Slides help. A good lesson plan helps. But the tools you use during the presentation make the difference between a class where students follow along and one where they zone out after ten minutes.
This guide covers the presentation tools that online teachers actually use, with a focus on the ones that improve clarity and engagement during live lessons. Screen annotation is at the center of that toolkit, and Penslide is the tool I recommend for teachers who want something fast, clean, and uncomplicated.
The Core Toolkit for Online Teaching
Before diving into specific tools, it helps to understand the layers of an online teaching setup. Each layer serves a different purpose, and they work together to create an effective lesson.
Presentation Software
This is where your lesson content lives. PowerPoint, Google Slides, Keynote, or Canva. You build your slides, organize your material, and present from this app. Most teachers already have this part covered.
Video Call Platform
Zoom, Google Meet, Microsoft Teams, or another platform for live classes. This handles the camera feed, the audio, the screen share, and the chat. The platform is the delivery mechanism for your lesson.
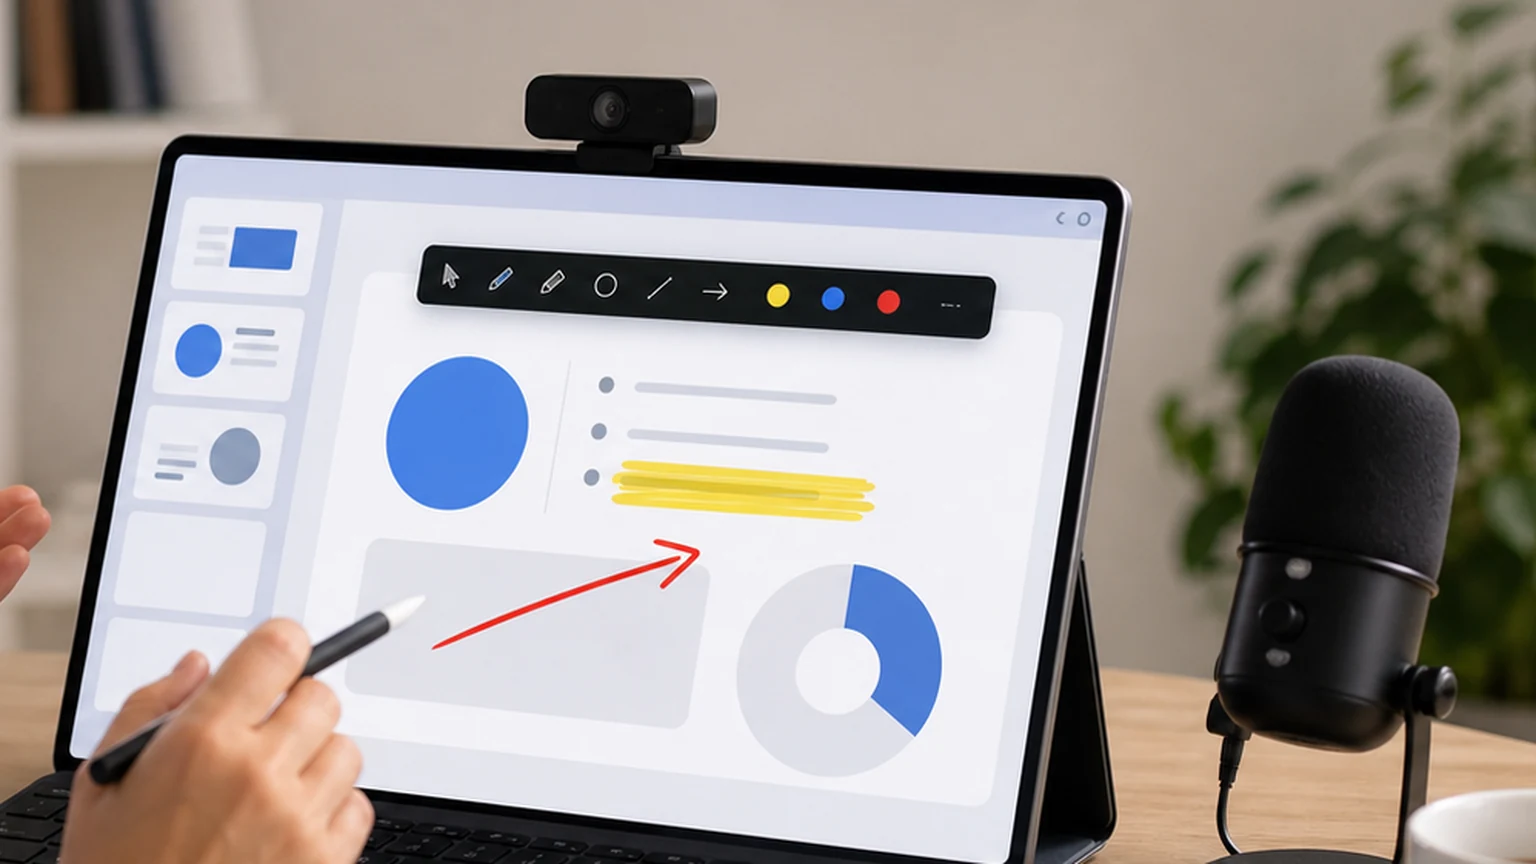
Screen Annotation Tool
This is the layer most teachers are missing. A screen annotation tool lets you draw on your screen in real time while students watch. You circle a concept on a slide, highlight a paragraph in a document, or draw an arrow between two ideas. The marks appear live in your screen share and disappear when you clear them.
Penslide fills this role. It works on top of any app, including your presentation software and your browser, so you can annotate whatever is on screen without switching tools.
Supplementary Tools
Depending on the subject, you might use a code editor, a spreadsheet, a document viewer, a video player, or a web browser during your lesson. The annotation tool needs to work across all of them, which is why standalone tools are more practical than built in slide annotation.
Why Screen Annotation Is the Most Underused Teaching Tool
Most teachers know about webcams, microphones, and slide software. Screen annotation is less discussed, but it addresses the single biggest problem in online teaching: directing student attention.
In a physical classroom, you gesture. You walk to the whiteboard. You tap the slide. You physically stand next to the thing you are talking about. Online, you lose all of that. Your cursor is the only pointer, and it is too small, too fast, and too ambiguous to serve as an effective attention director.
Screen annotation gives you back the physical gestures in digital form. A circle replaces a pointed finger. A highlight replaces a tap on the board. An underline replaces leaning in and saying "this one right here." These marks are visible, persistent until cleared, and unambiguous.
How Teachers Use Annotation in Practice
The value of annotation becomes clear in specific teaching scenarios. Here are the ones that come up most often.
Walking Through a Slide
A dense slide with five bullet points needs guidance. Without annotation, students read all five at once and lose the sequence. With annotation, you highlight the first point, discuss it, clear, highlight the second, discuss it, and so on. Students process the information in order, the way you intended.
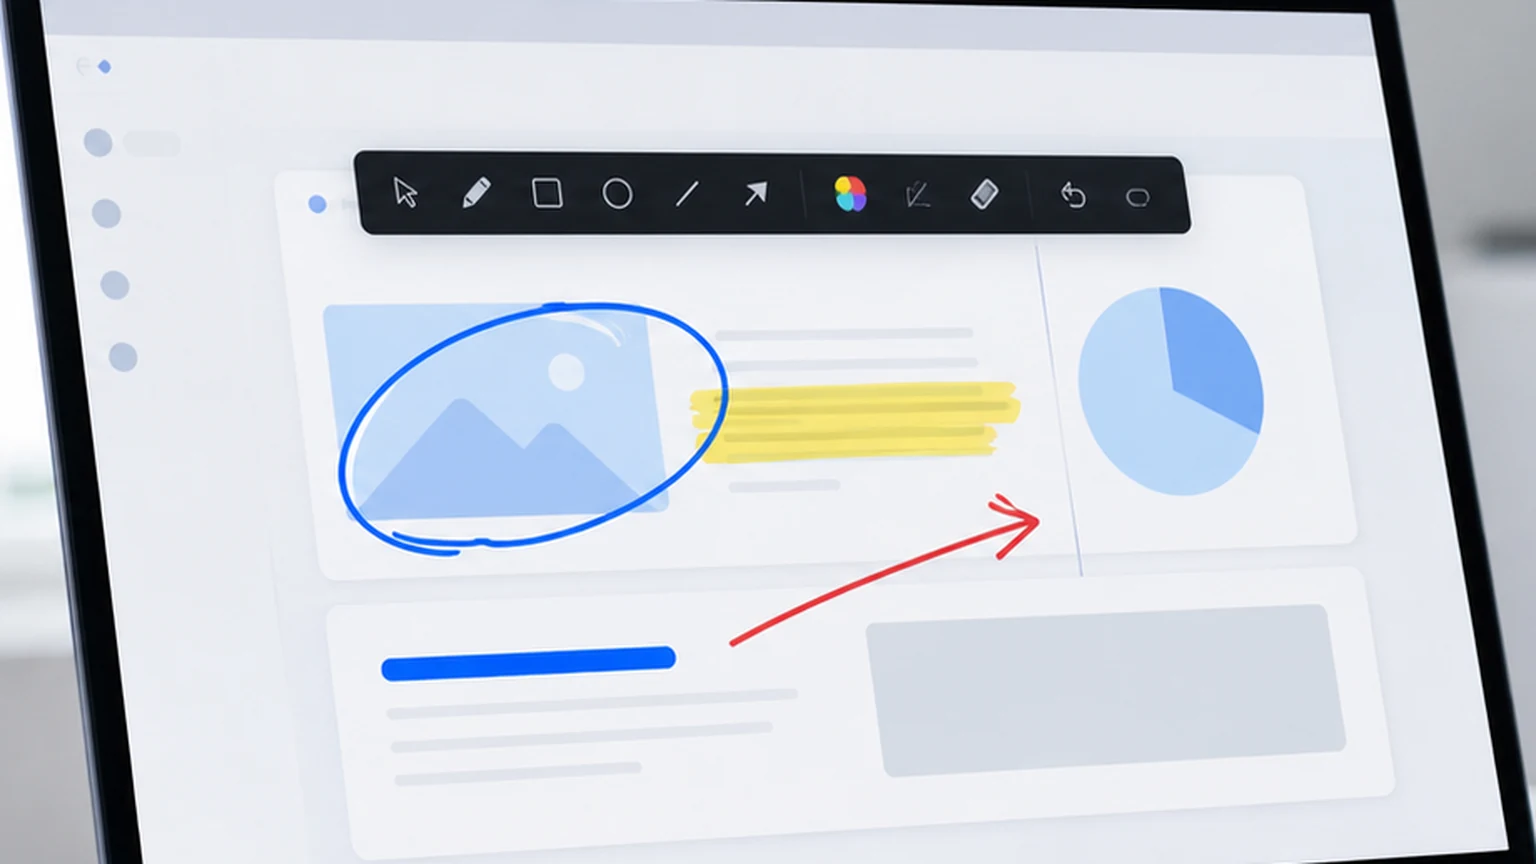
Explaining a Diagram
Diagrams with multiple components need a tour guide. Circle the first component, explain it. Draw an arrow to the second, explain the connection. Highlight the output section. The visual trail matches the logical flow of the explanation. Students follow the trail instead of trying to decode the diagram independently.
Comparing Before and After
When showing a before and after example, two code versions, two drafts of an essay, two versions of a budget, annotation makes the differences visible. Circle the changed element on each side. Draw a line connecting them. The comparison becomes concrete instead of abstract.
Responding to Questions
When a student asks a question about something on screen, you can respond visually. "Which function handles that?" Circle the function. "Where does this data come from?" Draw an arrow from the data source to the output. Visual answers are faster and more precise than verbal ones.
Live Software Demos
Teachers who teach software skills, Excel, Python, Photoshop, accounting tools, need to annotate the interface while demonstrating. Circle the menu. Highlight the option. Underline the result. The screen drawing app guide covers more on this tutorial workflow.
Setting Up Penslide for Teaching
Here is a practical setup guide for teachers who want to add annotation to their online lessons.
- Download Penslide from the download page. It is a single .exe file.
- Save it somewhere easy to access, like your Desktop or a teaching tools folder.
- Before your lesson, open Penslide. The toolbar appears at the screen edge.
- Open your slide deck or teaching materials.
- Start your video call and share your screen.
- During the lesson, click the pen or highlighter on the Penslide toolbar to annotate.
- Clear annotations before advancing slides or switching topics.
That is the entire setup. There is no installation, no account creation, and no configuration. The toolbar works on top of any app, so it does not matter which presentation software or browser you use.
Choosing Annotation Colors for Teaching
Color choice in annotation is more important than it seems. The right colors improve readability and help students track your explanation.
Red for Emphasis
Red stands out on most backgrounds. Use it for important marks: circling a key concept, underlining a critical term, or drawing attention to a warning. Red says "look here" instinctively.
Yellow for Highlighting
Yellow is the traditional highlighter color. It works well on white backgrounds for marking text passages, data rows, and code lines. Students recognize yellow highlighting from their own study habits, which makes it immediately intuitive.
Blue for Secondary Marks
Use blue for supporting annotations: connecting arrows, secondary labels, or annotations that support the main point without competing with it. Blue is visible but less aggressive than red.
One Color Per Slide
In most cases, one color per slide is enough. If you are making one point per slide, one color keeps the annotation clean. Use multiple colors only when you need to distinguish between two or more concurrent ideas on the same screen.
Annotation Habits for Better Lessons
Good annotation is a teaching skill, not just a software skill. These habits make annotation more effective in live lessons.
Less Is More
One annotation per concept is ideal. A single circle on a clean slide draws the eye immediately. Five circles on a busy slide create visual noise. Reserve annotation for the moments that need it, and leave the rest of the slide clean.
Timing Matters
Annotate after you introduce the point verbally. "The key metric is revenue growth" and then circle the revenue number. The verbal introduction primes the student's attention. The annotation delivers the visual payoff. Reversing the order, annotating first and then explaining, is less effective because students read the mark before hearing the context.
Clear Frequently
After each annotated explanation, clear before moving to the next topic. Stale annotations from a previous point confuse students about what is current. A clean transition between topics keeps the lesson organized.
Practice the Workflow
Spend five minutes before your first annotated lesson drawing circles, lines, and highlights on your screen. Get comfortable with the pen speed, the clear button, and the color picker. A brief practice session eliminates fumbling during the real lesson.
How Penslide Compares to Built In Slide Annotation
PowerPoint and Google Slides have pen and highlighter tools built into presentation mode. These work for annotating slides, but they disappear the moment you leave the slideshow.
If your entire lesson happens inside a slide deck, built in tools are fine. But most online lessons involve switching between apps: slides to browser, browser to spreadsheet, spreadsheet to document. A standalone annotation tool like Penslide works across all of them without interruption.
For a detailed comparison of standalone annotation tools, see the presentation annotation tool guide. For alternatives to specific tools, the ZoomIt alternative comparison and Epic Pen alternative guide are also useful.
Beyond Annotation: Building a Complete Teaching Setup
Annotation is one piece of the puzzle. Here are other tools that complement it.
- A good microphone. Clear audio matters more than video quality in online teaching.
- A second monitor. Use one screen for your lesson materials and the other for the video call interface and chat.
- A digital whiteboard for freeform brainstorming sessions that go beyond slide content.
- A screen recording tool for creating asynchronous lesson videos with annotation built in.
Penslide fits into this setup as the annotation layer. It works alongside your other tools without conflicting with them.
FAQ
Do I need a touchscreen or stylus for annotation?
No. A regular mouse or trackpad works well for the types of annotation used in teaching: circles, underlines, highlights, and arrows. A stylus can make freehand drawing smoother, but it is not required.
Can students see my annotations during a live class?
Yes. Penslide draws on your desktop, so annotations appear in your screen share on Zoom, Teams, Google Meet, or any other video call platform. Students see your marks in real time.
Is Penslide free for teachers?
Yes. Penslide is completely free for all users, including teachers. There are no paid tiers, no feature restrictions, and no upgrade prompts.
Can I annotate over a browser, not just slides?
Yes. Penslide works on top of any application, including browsers, spreadsheets, code editors, and PDF viewers. You can annotate whatever is visible on your screen.
Conclusion
Online teaching requires more than slides and a webcam. The missing piece for most teachers is a way to point at things on screen, highlight important content, and draw connections between ideas. Screen annotation fills that gap.
Penslide makes annotation available in a free, portable, lightweight format. It works across all apps, launches instantly, and keeps a compact toolbar that does not distract students. For teachers who teach online, it is one of the highest value tools you can add to your setup, and it takes about thirty seconds to get started.
Get Started
Download Penslide from the download page and try it in your next class. Visit the homepage for a full overview, check the feature list, or read the presentation annotation guide for specific techniques.
Use Penslide with the next screen share
Open Penslide, point to the part of your screen you need, and draw in a way that keeps the audience on the same page. It works with slide decks, browser windows, and shared apps.