How to Highlight Anything on Your Screen During Meetings
You are in a meeting. Someone shares a report on screen. Thirty rows of data, six columns, and a wall of numbers. The speaker says, "Notice the conversion rate in March." You scan the spreadsheet. March. Which column was the conversion rate? Is it the third row or the fourth? By the time you find it, the speaker has moved on to April.
Highlighting on screen solves this in one motion. The speaker sweeps a transparent yellow mark over the March conversion rate cell, and every person on the call sees it instantly. No scanning. No guessing. No missed context.
This guide explains how to highlight anything on your screen during meetings, what tools work best, and how to develop a highlighting workflow that keeps meetings efficient. Penslide is the tool I use for this, and I will show how it fits into the process.
Why Highlighting Works Better Than Pointing
Cursor pointing is the instinctive response when you need to direct attention on screen. You move your cursor to the thing you are referencing and hope people follow. The problem is threefold.
First, the cursor is small. On a high resolution display shared through a video call, the cursor can be nearly invisible against dense content.
Second, the cursor moves. The moment you move the mouse to explain the next point, the cursor leaves the area you were referencing. Your audience loses the reference point.
Third, the cursor is ambiguous. When you hover over a table, the cursor sits between four cells. Your audience does not know which cell you mean. A highlight covers the exact cell, row, or paragraph with no ambiguity.
Highlighting is different because the mark stays on screen until you clear it. It covers the exact content you mean. And it is visible enough to catch attention without being so opaque that it hides the content.
What You Need to Highlight on Your Screen
Highlighting during meetings requires a screen annotation tool with a proper highlighter mode. Not every annotation app has one. Some only offer a solid pen, which covers the content instead of emphasizing it. Here is what you need.
Semi Transparent Highlighter
The highlight should use a transparent color that lets the underlying content show through. Yellow on white text, for example, lets you read the text while clearly marking which text is being discussed. A solid color covers the text and defeats the purpose.
Desktop Wide Coverage
The highlighting tool needs to work on any app: spreadsheets, slides, browsers, PDFs, code editors, dashboards. If the tool only works inside a specific app, you lose coverage the moment you switch to a different one.
Quick Activation and Clear
You highlight, you discuss, you clear. That cycle happens multiple times per meeting. The activation and clear steps need to be fast: one click each. Anything more creates friction that slows the meeting down.
Multiple Colors
Yellow is the default, but different backgrounds need different colors. Dark slides need a bright highlight. Code editors with dark themes need light colors. Having at least three or four highlight colors available lets you match the highlight to the content.
How to Highlight on Your Screen Step by Step
Here is the practical process using Penslide.
Step 1: Open Penslide
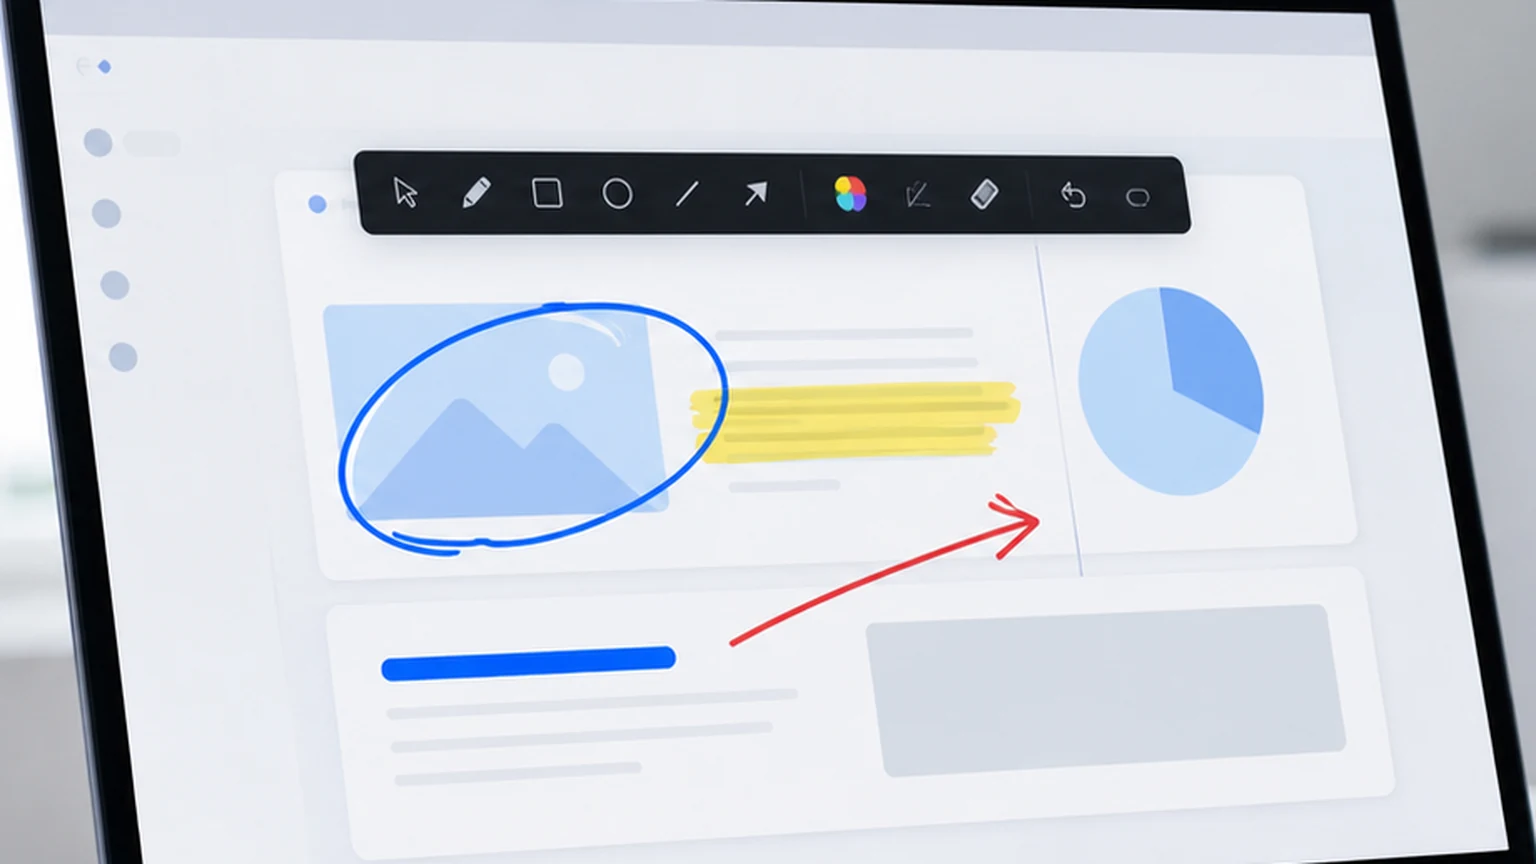
Before your meeting starts, open Penslide. The toolbar appears at the edge of your screen. It stays on top of all other windows, including your video call app. Download it from the download page if you do not have it yet.
Step 2: Start Your Screen Share
Share your screen through Zoom, Teams, Google Meet, or whatever platform you use. The Penslide toolbar will be visible in the share, but it is compact enough that it does not distract.
Step 3: Select the Highlighter
Click the highlighter tool on the Penslide toolbar. Choose your color. Yellow works for most white or light backgrounds. Blue or pink works for darker backgrounds.
Step 4: Highlight the Content
Drag across the text, cell, row, or section you want to emphasize. The semi transparent highlight appears on screen, visible to everyone in the meeting. The content underneath remains readable.
Step 5: Discuss the Highlighted Content
With the highlight visible, discuss the point you are making. Your audience's eyes are already on the right content. Your words and their visual focus are aligned.
Step 6: Clear and Move On
When you are ready to move to the next topic, click the clear button on the toolbar. All highlights disappear. The screen returns to its original state. Repeat the process for the next point.
Practical Examples of Screen Highlighting in Meetings
The technique is straightforward. The value shows up in the details of specific meeting types.
Financial Review Meetings
Financial reviews involve dense spreadsheets and dashboards. Highlighting the specific metric, row, or chart you are discussing keeps everyone looking at the same number. "Revenue is up 12% quarter over quarter" becomes concrete when you highlight the 12% cell. Without the highlight, three people are looking at three different numbers.
Project Status Updates
When sharing a project board, Gantt chart, or task list, highlight the specific task or milestone being discussed. "The design phase is two days behind schedule" lands better when the design milestone is highlighted in yellow. The team sees the delay immediately instead of scanning the entire timeline.
Document Reviews
Reviewing a contract, proposal, or policy document during a meeting is easier with highlighting. Mark the clause under discussion. The meeting stays focused on that specific section instead of drifting into general comments about the document. Clear the highlight before moving to the next clause.
Design Feedback Sessions
When reviewing a design mockup, highlighting the element under discussion prevents misunderstandings. "I think this section needs more spacing" is vague. Highlighting the specific section makes the feedback precise. For more on annotation in visual reviews, see the screen drawing app guide.
Data Analysis Discussions
When analyzing data on a shared screen, highlighting a specific data point, trend line, or outlier directs the conversation. The audience discusses the highlighted data instead of interpreting the chart independently. This speeds up consensus and reduces the "are we looking at the same thing?" confusion.

Common Highlighting Mistakes
Highlighting is simple, but these mistakes reduce its effectiveness.
Highlighting Too Much
If half the screen is highlighted, nothing stands out. Use highlighting selectively. One highlight per point, cleared before the next point. The power comes from contrast: a small mark on a large, unmarked surface draws attention.
Wrong Color for the Background
Yellow highlighting on a yellow background is invisible. Check that your highlight color contrasts with the content behind it. Switch to blue or pink when the background is light yellow or warm toned.
Forgetting to Clear
Old highlights from a previous topic confuse the audience about what is currently being discussed. Always clear before moving to a new point. This is the single most important habit in meeting annotation.
Using the Pen Instead of the Highlighter
The pen draws a solid line that covers content. The highlighter draws a transparent stripe that emphasizes content. For text, rows, and paragraphs, always use the highlighter. Use the pen for shapes like circles and arrows. Matching the tool to the content type produces cleaner results.
Highlighting vs. Other Emphasis Methods
How does highlighting compare to other ways of directing attention during meetings?
Cursor pointing is fast but imprecise and temporary. The cursor moves the instant you start explaining the next point. Highlighting stays until you clear it.
Zooming in shows more detail but loses the surrounding context. You see the cell but not the rest of the spreadsheet. Highlighting keeps the full view while adding emphasis.
Circling with a pen is good for discrete items like buttons and icons. Highlighting is better for continuous content like text, rows, and paragraphs. Use both together: circle the metric label, highlight the metric value. Penslide includes both tools for exactly this reason.
For more on pen versus highlighter techniques, see the screen highlighter tool guide. For annotation during presentations specifically, the presentation annotation guide covers additional techniques.
Using Highlighting Across Different Meeting Platforms
Penslide works with every video call platform because it draws on your desktop, not inside the call app. Here is how that plays out in practice.
- Zoom: Share your screen or a specific app window. Your highlights appear in the shared feed. Zoom's built in annotation can conflict with desktop annotation, so disable it if you use Penslide.
- Microsoft Teams: Share your screen. Highlights appear in the share. Teams does not have its own annotation tool for presenters, so Penslide fills that gap cleanly.
- Google Meet: Share your entire screen. Highlights appear in the shared view. Meet does not offer annotation tools, making a desktop tool essential.
- Webex: Share your screen. Same principle as the other platforms. The desktop annotation layer appears in the share.
FAQ
Does highlighting on my screen affect the actual document?
No. The highlighting happens on a transparent overlay layer. Your documents, spreadsheets, and apps are completely unchanged. When you clear the highlights, everything returns to its original appearance.
Can I highlight on a dark background?
Yes. Switch your highlight color to something that contrasts with the dark background, like light blue, green, or pink. Yellow on dark backgrounds can be hard to read, so a lighter color works better.
Does the highlight show up in screen recordings?
Yes. Because the highlight is drawn on your desktop, it appears in any screen recording software. This includes OBS, Loom, Camtasia, and the built in screen recording tools in Windows.
How do I clear highlights quickly during a meeting?
Penslide has a one click clear button on the toolbar and supports keyboard shortcuts for clearing. Both options remove all highlights instantly, keeping your meeting flow smooth.
Conclusion
Highlighting on your screen during meetings is one of those techniques that seems trivial until you use it. The first time you highlight a cell in a spreadsheet and every person on the call immediately knows what you are referencing, you realize how much time cursor pointing was wasting.
The technique is simple: sweep a transparent color over the content you are discussing, explain your point, clear, and move on. Penslide makes this available in a free, portable tool that works across every app on your Windows desktop.
If you share your screen in meetings, this is worth trying in your next call.
Get Started
Download Penslide from the download page and try highlighting in your next meeting. Visit the homepage for the full overview and features. For related techniques, read the presentation annotation tool guide or the free screen annotation tool guide.
Use Penslide with the next screen share
Open Penslide, point to the part of your screen you need, and draw in a way that keeps the audience on the same page. It works with slide decks, browser windows, and shared apps.